이번 단계는 custom object를 탐지하기 위해, 우리의 object detection 모델을 학습하고, 모델 환경을 설정할 것이다.


5. 학습에 사용할 모델 고르기


새로운 오브젝트를 학습하기 위해서 두가지 방법이 있다고 한다.

Here, we have two options. We can use a pre-trained model, and then use transfer learning to learn a new object, or we could learn new objects entirely from scratch. The benefit of transfer learning is that training can be much quicker, and the required data that you might need is much less. For this reason, we're going to be doing transfer learning here.

TODO 위의 두 가지 방법에 대한 언급은 아직 잘 모르겠다. 꼭 알아야 하는부분 같으니 차후 다시 학습하기로 하자.


TensorFlow has quite a few pre-trained models with checkpoint files available, along with configuration files. You can do all of this yourself if you like by checking out their configuring jobs documentation. The object API also provides some sample configurations to choose from.

TODO 위의 언급은 아직 잘 모르겠다. 꼭 알아야 하는부분 같으니 차후 다시 학습하기로 하자.


일단 블로거가 가이드한대로 따라가기로 한다.


먼저 checkpoint 와 configuration 파일을 다운 받는다.


I am going to go with mobilenet, using the following checkpoint and configuration file
wget https://raw.githubusercontent.com/tensorflow/models/master/object_detection/samples/configs/ssd_mobilenet_v1_pets.config
wget http://download.tensorflow.org/models/object_detection/ssd_mobilenet_v1_coco_11_06_2017.tar.gz
You can check out some of the other checkpoint options to start with here.

models/object_detection 디렉토리에서 ssd_mobilenet_v1을 가져와서 training 디렉토리에 놓는다.
ssd_mobilenet_v1_pets.config을 우리 환경에 맞게 그리고 여러 하이퍼 파라미터들을 조정 할 수 있다.
여기에서는
우리 환경에 맞게 설정해야할 몇몇 값들을 수정한다.
Put the config in the training directory, and extract the ssd_mobilenet_v1 in the models/object_detection directory
In the configuration file, you need to search for all of the PATH_TO_BE_CONFIGURED points and change them. You may also want to modify batch size.
Currently, it is set to 24 in my configuration file. Other models may have different batch sizes.
If you get a memory error, you can try to decrease the batch size to get the model to fit in your VRAM.
Finally, you also need to change the checkpoint name/path, num_classes to 1, num_examples to 12,
and label_map_path: "training/object-detect.pbtxt"

- 클래스가1개 이기때문에 num_classes를 1로 설정
- batch size는 메모리 여건에 따라서 조정
- fine_tune_checkpoint 경로 변경
- 학습 횟수가 디폴트로 20만번으로 되어있다. 상황에 따라서 num_steps을 조정
- train_input_reader의 input_path, label_map_path 경로 변경
- eval_input_readerinput_path, label_map_path 경로 변경
- TODO 기타 설정 값들에 대한 정리 자료 작성 필요

It's a few edits, so here is my full configuration file:
# SSD with Mobilenet v1, configured for the mac-n-cheese dataset.
# Users should configure the fine_tune_checkpoint field in the train config as
# well as the label_map_path and input_path fields in the train_input_reader and
# eval_input_reader. Search for "${YOUR_GCS_BUCKET}" to find the fields that
# should be configured.
model {
  ssd {
    num_classes: 1
    box_coder {
      faster_rcnn_box_coder {
        y_scale: 10.0
        x_scale: 10.0
        height_scale: 5.0
        width_scale: 5.0
      }
    }
    matcher {
      argmax_matcher {
        matched_threshold: 0.5
        unmatched_threshold: 0.5
        ignore_thresholds: false
        negatives_lower_than_unmatched: true
        force_match_for_each_row: true
      }
    }
    similarity_calculator {
      iou_similarity {
      }
    }
    anchor_generator {
      ssd_anchor_generator {
        num_layers: 6
        min_scale: 0.2
        max_scale: 0.95
        aspect_ratios: 1.0
        aspect_ratios: 2.0
        aspect_ratios: 0.5
        aspect_ratios: 3.0
        aspect_ratios: 0.3333
      }
    }
    image_resizer {
      fixed_shape_resizer {
        height: 300
        width: 300
      }
    }
    box_predictor {
      convolutional_box_predictor {
        min_depth: 0
        max_depth: 0
        num_layers_before_predictor: 0
        use_dropout: false
        dropout_keep_probability: 0.8
        kernel_size: 1
        box_code_size: 4
        apply_sigmoid_to_scores: false
        conv_hyperparams {
          activation: RELU_6,
          regularizer {
            l2_regularizer {
              weight: 0.00004
            }
          }
          initializer {
            truncated_normal_initializer {
              stddev: 0.03
              mean: 0.0
            }
          }
          batch_norm {
            train: true,
            scale: true,
            center: true,
            decay: 0.9997,
            epsilon: 0.001,
          }
        }
      }
    }
    feature_extractor {
      type: 'ssd_mobilenet_v1'
      min_depth: 16
      depth_multiplier: 1.0
      conv_hyperparams {
        activation: RELU_6,
        regularizer {
          l2_regularizer {
            weight: 0.00004
          }
        }
        initializer {
          truncated_normal_initializer {
            stddev: 0.03
            mean: 0.0
          }
        }
        batch_norm {
          train: true,
          scale: true,
          center: true,
          decay: 0.9997,
          epsilon: 0.001,
        }
      }
    }
    loss {
      classification_loss {
        weighted_sigmoid {
          anchorwise_output: true
        }
      }
      localization_loss {
        weighted_smooth_l1 {
          anchorwise_output: true
        }
      }
      hard_example_miner {
        num_hard_examples: 3000
        iou_threshold: 0.99
        loss_type: CLASSIFICATION
        max_negatives_per_positive: 3
        min_negatives_per_image: 0
      }
      classification_weight: 1.0
      localization_weight: 1.0
    }
    normalize_loss_by_num_matches: true
    post_processing {
      batch_non_max_suppression {
        score_threshold: 1e-8
        iou_threshold: 0.6
        max_detections_per_class: 100
        max_total_detections: 100
      }
      score_converter: SIGMOID
    }
  }
}
train_config: {
  batch_size: 10
  optimizer {
    rms_prop_optimizer: {
      learning_rate: {
        exponential_decay_learning_rate {
          initial_learning_rate: 0.004
          decay_steps: 800720
          decay_factor: 0.95
        }
      }
      momentum_optimizer_value: 0.9
      decay: 0.9
      epsilon: 1.0
    }
  }
  fine_tune_checkpoint: "ssd_mobilenet_v1_coco_11_06_2017/model.ckpt"
  from_detection_checkpoint: true
  data_augmentation_options {
    random_horizontal_flip {
    }
  }
  data_augmentation_options {
    ssd_random_crop {
    }
  }
}
train_input_reader: {
  tf_record_input_reader {
    input_path: "data/train.record"
  }
  label_map_path: "data/object-detection.pbtxt"
}
eval_config: {
  num_examples: 40
}
eval_input_reader: {
  tf_record_input_reader {
    input_path: "data/test.record"
  }
  label_map_path: "training/object-detection.pbtxt"
  shuffle: false
  num_readers: 1
}
TODO pbtxt 역할에 대해서 정리하기.
vi object-detection.pbtxt
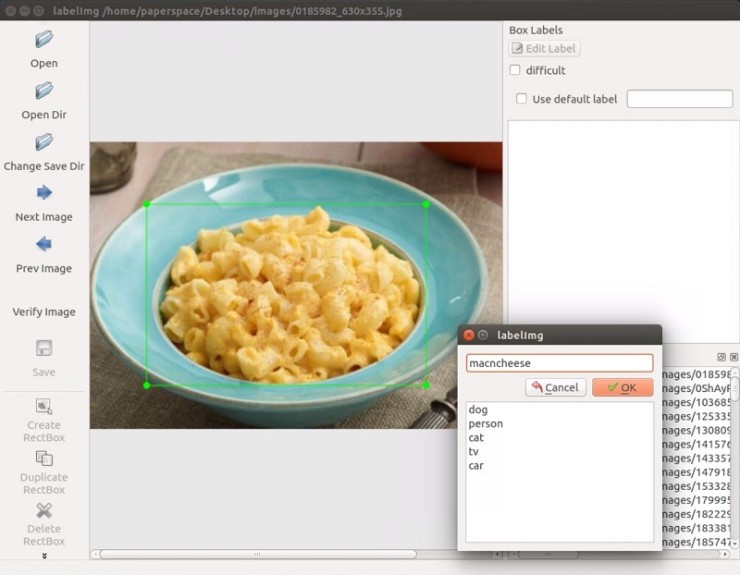
Inside training dir, add object-detection.pbtxt: 
item {  
 id: 1  
 name: 'macncheese'
}
6. 학습 시키기(Train)
학습이 진행되는 것을보여준다. 
And now, the moment of truth! From within models/object_detection:
python train.py --logtostderr --train_dir=training/ --pipeline_config_path=training/ssd_mobilenet_v1_pets.config

Barring errors, you should see output like:
INFO:tensorflow:global step 11788: loss = 0.6717 (0.398 sec/step)
INFO:tensorflow:global step 11789: loss = 0.5310 (0.436 sec/step)
INFO:tensorflow:global step 11790: loss = 0.6614 (0.405 sec/step)
INFO:tensorflow:global step 11791: loss = 0.7758 (0.460 sec/step)
INFO:tensorflow:global step 11792: loss = 0.7164 (0.378 sec/step)
INFO:tensorflow:global step 11793: loss = 0.8096 (0.393 sec/step)

7. Export graph from new trained model
Your steps start at 1 and the loss will be much higher. Depending on your GPU and how much training data you have, 
this process will take varying amounts of time. On something like a 1080ti, it should take only about an hour or so.
If you have a lot of training data, it might take much longer.
You want to shoot for a loss of about ~1 on average (or lower).
I wouldn't stop training until you are for sure under 2. You can check how the model is doing via TensorBoard.
Your models/object_detection/training directory will have new event files that can be viewed via TensorBoard.
From models/object_detection, via terminal, you start TensorBoard with:
tensorboard --logdir='training'
This runs on 127.0.0.1:6006 (visit in your browser)
My total loss graph:


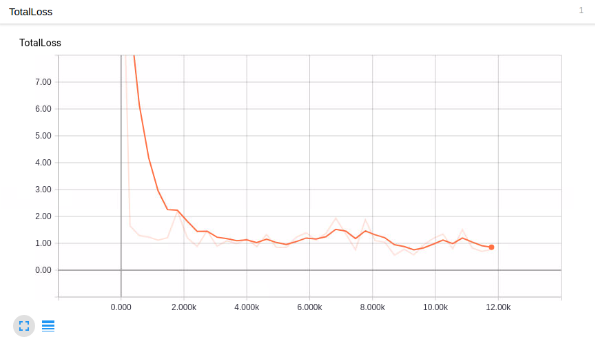
Looks good enough, but does it detect macaroni and cheese?!
In order to use the model to detect things, we need to export the graph, so, in the next tutorial, 
we're going to export the graph and then test the model.
Posted by 이성윤

LabelImg


LabelImg is a graphical image annotation tool.

It is written in Python and uses Qt for its graphical interface.

Annotations are saved as XML files in PASCAL VOC format, the format used byImageNet.

Demo Image

Demo Image

Watch a demo video

Installation

Download prebuiltbinaries

Build from source

Linux/Ubuntu/Mac requires at least Python 2.6and has been tested with PyQt 4.8.

Ubuntu Linux

Python 2 + Qt4

sudo apt-getinstall pyqt4-dev-tools

sudo pip installlxml

make qt4py2

python labelImg.py

python labelImg.py[IMAGE_PATH] [PRE-DEFINED CLASS FILE]


Python 3 + Qt5

sudo apt-getinstall pyqt5-dev-tools

sudo pip3 installlxml

make qt5py3

python3labelImg.py

python3labelImg.py [IMAGE_PATH] [PRE-DEFINED CLASS FILE]

macOS

Python 2 + Qt4

brew install qtqt4

brew installlibxml2

make qt4py2

python labelImg.py

python  labelImg.py [IMAGE_PATH] [PRE-DEFINED CLASSFILE]

Windows

Download and setup Python 2.6 orlater, PyQt4and install lxml.

Open cmd and go to labelImgdirectory

pyrcc4 -oresources.py resources.qrc

python labelImg.py

python labelImg.py[IMAGE_PATH] [PRE-DEFINED CLASS FILE]

Get from PyPI

pip installlabelImg

labelImg

labelImg[IMAGE_PATH] [PRE-DEFINED CLASS FILE]

I tested pip on Ubuntu 14.04 and 16.04. However, I didn't test pip on macOSand Windows

Use Docker

docker run -it \

--user $(id -u) \

-eDISPLAY=unix$DISPLAY \

--workdir=$(pwd) \

--volume="/home/$USER:/home/$USER"\

--volume="/etc/group:/etc/group:ro"\

--volume="/etc/passwd:/etc/passwd:ro"\

--volume="/etc/shadow:/etc/shadow:ro"\

--volume="/etc/sudoers.d:/etc/sudoers.d:ro"\

-v /tmp/.X11-unix:/tmp/.X11-unix\

tzutalin/py2qt4


makeqt4py2;./labelImg.py

You can pull the image which has all of the installed and requireddependencies. Watch a demo video

Usage

Steps

  1. Build and launch using the instructions above.
  2. Click 'Change default saved annotation folder' in Menu/File
  3. Click 'Open Dir'
  4. Click 'Create RectBox'
  5. Click and release left mouse to select a region to annotate the rect box
  6. You can use right mouse to drag the rect box to copy or move it

The annotation will be saved to the folder you specify.

You can refer to the below hotkeys to speed up your workflow.

Create pre-definedclasses

You can edit the data/predefined_classes.txtto load pre-defined classes

Hotkeys

Ctrl + u

Load all of the images from a directory

Ctrl + r        

Change the default annotation target dir

Ctrl + s

Save

Ctrl + d

Copy the current label and rect box

Space

Flag the current image as verified

w

Create a rect box

d

Next image

a

Previous image

del

Delete the selected rect box

Ctrl++

Zoom in

Ctrl--

Zoom out

↑→↓←

Keyboard arrows to move selected rect box

How to contribute

Send a pull request

License

Free software:MIT license

Citation: Tzutalin. LabelImg. Git code (2015). https://github.com/tzutalin/labelImg

Related

  1. ImageNet Utils to download image, create a label text for machine learning, etc
  2. Use Docker to run labelImg
  3. Generating the PASCAL VOC TFRecord files
Posted by 이성윤

머신러닝을 시작하면서 "데이터가 가장 중요하다.", "데이터가 돈이 된다" 이런 말들을 들었었다.


저런 말들을 들었을때, 그럴 수 있겠구나 싶었지만 와닿지는 않았다.

이번 과정을 통해서 왜 알바를 써서 이미지를 레이블링하는지, 왜 데이터가 중요하는지 등을 느낄 수 있었다.


1. 학습시킬 이미지 준비

sentdex로 부터 제공받은 macaroni and cheese를 사용하겠다. 이미지는 Google, Bing, ImageNet에서 수집했으며 이미지의 크기는 대부분 800x600 이다.

어떤 이미지이든지 100개 이상의 이미지를 확보해야 하며, 이미지가 확보 되면 레이블링 처리하는 Annotation을 수행해야 한다.

TODO 구글에서 내가 원하는 이미지를 확보할 수 있는 도구 찾아보기

TODO 구글에서 내가 원하는 이미지를 쉽게 확보 할 수 있는 도구 만들어보기


2. Annotate/label

이미지 레이블링은 labelImg 도구를 사용한다.

labelImg: https://github.com/tzutalin/labelImg


labelImg 설치는 다음을 참조한다.

[설치] image annotation tool

http://cafe.naver.com/telcosn/661


labelImg를 설치하고나서 데스크탑 모드에서 실행을 한다.

$ python labelImg.py


실행을 하고나면, GUI Window가 실행된다.

python tutorials


- 이미지가 저장되어 있는 디렉토리를 오픈한다.

- Create RectBox 버튼을 클릭하여 사진에서 Object를 드래그하여 레이블링을 한다.

- ctrl+s 로 저장을 하면 이미지와 같은 이름으로 xml 파일이 생성된다. 일반적으로 ANNOTATION이라는 디렉토리에 저장하는것이 관례인듯하다.

 ※ TODO XML파일을 열어보니 각각의 의미하는 내용을 정리해야 할 것 같다.


<annotation>
    <folder>images</folder>
    <filename>velveetashellsandcheese.jpg</filename>
    <path>/home/paperspace/Desktop/images/velveetashellsandcheese.jpg</path>
    <source>
        <database>Unknown</database>
    </source>
    <size>
        <width>900</width>
        <height>602</height>
        <depth>3</depth>
    </size>
    <segmented>0</segmented>
    <object>
        <name>macncheese</name>
        <pose>Unspecified</pose>
        <truncated>0</truncated>
        <difficult>0</difficult>
        <bndbox>
            <xmin>167</xmin>
            <ymin>169</ymin>
            <xmax>795</xmax>
            <ymax>527</ymax>
        </bndbox>
    </object>
</annotation>
cs


- 보유하고 있는 모든 이미지를 위의 방법으로 반복해서 작업한다.


3. 보유하고 있는 데이터를 train/test sample로 나누기

아래의 디렉토리 구조를 생성하고, 보유하고 있는 데이터를 train/test를 나눈다.


Object-Detection
-images/
--test/
---testingimages.jpg
--train/
---testingimages.jpg
--...yourimages.jpg
--...yourimages.xml
cs


4. 학습을 위한 TF Records 변환

참고: [TFRecord] 텐서플로우 트레이닝 데이타 포맷인 *.tfrecord 파일 읽고 쓰기 [펌]

TFRecord 파일 포맷이란

TFRecord 파일은 텐서플로우의 학습 데이타 등을 저장하기 위한 바이너리 데이타 포맷으로, 구글의 Protocol Buffer 포맷으로 데이타를 파일에 Serialize 하여 저장한다.

CSV 파일에서와 같이 숫자나 텍스트 데이타를 읽을때는 크게 지장이 없지만, 이미지를 데이타를 읽을 경우 이미지는 JPEG나 PNG 형태의 파일로 저장되어 있고 이에 대한 메타 데이타와 라벨은 별도의 파일에 저장되어 있기 때문에, 학습 데이타를 읽을때 메타데이타나 라벨용 파일 하나만 읽는 것이 아니라 이미지 파일도 별도로 읽어야 하기 때문에, 코드가 복잡해진다.


또한 이미지를 JPG나 PNG 포맷으로 읽어서 매번 디코딩을 하게 되면, 그 성능이 저하되서 학습단계에서 데이타를 읽는 부분에서 많은 성능 저하가 발생한다.


이와 같이 성능과 개발의 편의성을 이유로 TFRecord 파일 포맷을 이용하는 것이 좋다.


위와 같은 이유로 TFRecord 파일로 변환하기 위해서 labelImg를 통해 생성한 xml 파일을 먼저 CSV 파일로 변환해야 한다.


① xml 파일을 csv 파일로 변환하기 위해 Dat Tran 블로거가 작성한 xml_to_csv.py 스크립트를 사용한다.

github: https://github.com/datitran/raccoon_dataset

raccoon_dataset 의 xml_to_csv.py 스크립트를 수정하여 사용한다.


Within the xml_to_csv script, I changed:


def main():
    image_path
= os.path.join(os.getcwd(), 'annotations')
    xml_df
= xml_to_csv(image_path)
    xml_df
.to_csv('raccoon_labels.csv', index=None)
   
print('Successfully converted xml to csv.')
cs

To:


def main():
   
for directory in ['train','test']:
        image_path
= os.path.join(os.getcwd(), 'images/{}'.format(directory))
        xml_df
= xml_to_csv(image_path)
        xml_df
.to_csv('data/{}_labels.csv'.format(directory), index=None)
       
print('Successfully converted xml to csv.')
cs


생성된 CSV 파일을 Object-Detection 디렉토리에 data 디렉토리를 생성하고, data 디렉토리로 csv 파일을 옮긴다. 그리고 Object-Detection 디렉토리에 training 디렉토리를 생성한다. 지금까지의 디렉토리 구조는 아래와 같다.

Object-Detection
-data/
--test_labels.csv
--train_labels.csv
-images/
--test/
---testingimages.jpg
--train/
---testingimages.jpg
--...yourimages.jpg
-training
-xml_to_csv.py
cs


② 이제 CSV 파일을 TFRecord파일로 변환하기 위해 Dat Tran 블로거가 작성한 generate_tfrecord.py 스크립트를 사용한다.

Within the generate_tfrecord script, I changed:


# TO-DO replace this with label map
def class_text_to_int(row_label):
    if row_label == 'raccoon':
        return 1
    else:
        None

cs

To:


# TO-DO replace this with label map
def class_text_to_int(row_label):
    if row_label == 'macncheese':
        return 1
    else:
        None
cs


TODO 현재 Class가 macncheese 한 종류이기 때문에 하나만 작성한다. 만약 여러개의 클래스가 있다면 이부분을 수정해야 한다.


이제 generate_tfrecord.py 스크립트를 수행한다. train TFRecord와 test TFRecord를 위해 두번 수행하게 된다.

train TFRecord:


python generate_tfrecord.py --csv_input=data/train_labels.csv  --output_path=data/train.record
cs

test TFRecord:


python generate_tfrecord.py --csv_input=data/test_labels.csv  --output_path=data/test.record
cs


Next up, we need to setup a configuration file and then either train a new model or start from a checkpoint with a pre-trained model, which is what we'll be covering in the next tutorial.

Posted by 이성윤

Tensorflow의 Object Detection API를 사용하면서, 궁극적인 목표는 나만의 오브젝트들을 학습하여 영상 및 이미지 분석에 이용해 보는것 이었다.


이것을 하는데 여러 시행착오가 있었으며 지금까지 거쳐온 과정은 아래와 같다.


1. Nvidia-Docker 기반으로 tensorflow_gpu를 설치

    [설치] Installing tensorflow-gpu with Docker

2. Tensorflow Object Detection API 설치

    [설치] Object Detection API      

2. 오프라인 및 실시간 영상을 프레임 단위로 분석하기 위해서 Opencv 라이브러리를 설치

    [설치] Installing Opencv with Tensorflow    

3. Object Detection API Tutorial - 이미지 분석

    [API] Object Detection API를 이용한 오브젝트 인식하기 Part 1. - 설정 [펌]

4. Object Detection API Tutorial - 영상분석(실시간 및 녹화 영상)

    [API] Object Detection API를 이용한 오브젝트 인식하기 Part 3. - Web Cam 연동 [펌]

5. Tensorflow 학습 데이터 포맷 TFRecord

    [TFRecord] 텐서플로우 트레이닝 데이타 포맷인 *.tfrecord 파일 읽고 쓰기 [펌]

6.  Custom Object Detection - 동물 사진 학습 ( 실패 )

    [API] Tensorflow Object Detection API를 이용한 물체 인식 #2-동물 사진을 학습 시켜보자[펌]


처음으로 참조한 블로거의 동물 사진 학습하는 포스팅을 보고 시도하였으나 Google CloudML를 이용하여 학습하는 과정을 소개한것이라는 것을 알고 포기 하였다. (돈이 들어서)


국내 블로거들의 포스팅은 이제 크게 도움이 되지 못해서, 해외 블로거들의 글들로 눈을 돌린 시점이기도하다.

처음으로 검색해서 나온 블로거는 Dat Tran 이다.

https://towardsdatascience.com/how-to-train-your-own-object-detector-with-tensorflows-object-detector-api-bec72ecfe1d9

아래 내용을 기반으로 진행해보려 했으나 조금 어려워서 다른 블로거를 찾았다.

블로거: sentdex

블로그:

https://plus.google.com/+sentdex

https://www.youtube.com/watch?v=K_mFnvzyLvc&list=PLQVvvaa0QuDcNK5GeCQnxYnSSaar2tpku&index=3

https://pythonprogramming.net/custom-objects-tracking-tensorflow-object-detection-api-tutorial/


이 사람은 파이썬으로 상당히 다양한 프로젝트를 해본것 같다. 처음으로 찾은 Dat Tran이 포스팅한 내용을 인용하여 Custom Object Detection 하는 방법을 가이드 한다.


Tensorflow 에서 Custom Object Detection을 하기위한 과정은 다음과 같다.


1.학습시킬 이미지 준비

  학습 시킬 이미지는 일반적으로는 적어도 100장 또는 500장 이상의 이미지가 필요하다고 한다.

  하지만 내가 실무자로부터(R업체 솔루션을 개발한 대표)들은 바로는 적어도 2000장 보통은 20000~30000장의 이미지를 확보해야 정확도가 괜찮게 나온다고 들었다.

  ※ TODO 내가 학습 시키고 싶은 이미지를 쉽게 확보 할 수 있는 도구를 찾아보기.(또는 개발해보기)


2. Annotate/label

  Object Detection을 하려면 이미지와 해당 이미지에 대한 정보를 가지고 있는 XML 파일들이 있어야 한다.(이를 레이블링이라함)

  이미지 정보를 들고 있는 XML파일에는 이미지 이름, 이미지 종류, 이미지 내 detection 대상 이름, 좌표(xmin, xmax, ymin, ymax) 등이 포함되어야 한다.

  이렇게 이미지 레이블링을 도와주는 도구가 몇몇 있는것 같다.

   - labelImg: https://github.com/tzutalin/labelImg

   - FastAnnotationTool: https://github.com/christopher5106/FastAnnotationTool

   - ImageMagic: http://imagemagick.org/script/index.php


3. 보유하고 있는 데이터를 train/test sample로 나누기

  보유하고 있는 데이터를 train/test를 나누는 여러 가지가 있지만, 그 중 가장 대표적인 이유는 Overfitting 때문에 그렇다.

  내가 가지고 있는 데이터셋에만 적합한 학습데이터를 가지지 않으려는 노력인것이다.

4. 학습을 위한 TF Records 변환

  [TFRecord] 텐서플로우 트레이닝 데이타 포맷인 *.tfrecord 파일 읽고 쓰기 [펌] 을 참조

5. 학습에 사용할 모델 고르기

   config 파일 설정하기

   https://github.com/tensorflow/models/tree/master/research/object_detection/samples/configs

6. 학습 시키기(Train)

   https://github.com/tensorflow/models/blob/master/research/object_detection/g3doc/running_locally.md

   Tensorflow에서 가이드해주는 Config를 보면 학습시키는 단계가 무려 20만이다.. 어떤이가 CPU에서 100step을 돌리는데 1시간이나 걸렸다고한다. 나는 GPU를 사용하여 3만스텝 정도하는데 3시간쯤 걸린거 같다. 이래서 꼭 GPU를 써야 하는거 같다.

7. Export graph from new trained model

8. Detect custom objects in real time


이 블로거의 도움으로 나만의 오브젝트를 학습하여 탐지할 수 있는 방법을 알게 되었고 이제 포스팅을 시작한다.


Posted by 이성윤

tensorflow 에서 제공하는 Install 가이드를(https://www.tensorflow.org/install/install_linux) 통해서 설치해 보았다.


Determine how to install TensorFlow


Docker completely isolates the TensorFlow installation from pre-existing packages on your machine. The Docker container contains TensorFlow and all its dependencies. Note that the Docker image can be quite large (hundreds of MBs). You might choose the Docker installation if you are incorporating TensorFlow into a larger application architecture that already uses Docker.


Installing with Docker

Take the following steps to install TensorFlow through Docker:

  1. Install Docker on your machine as described in the Docker documentation.
  2. Optionally, create a Linux group called docker to allow launching containers without sudo as described in the Docker documentation. (If you don't do this step, you'll have to use sudo each time you invoke Docker.)
  3. To install a version of TensorFlow that supports GPUs, you must first install nvidia-docker, which is stored in github.
  4. Launch a Docker container that contains one of the TensorFlow binary images.

The remainder of this section explains how to launch a Docker container.


Docker를 통한 GPU 버전을 설치하기전에 nvidia-docker를 설치해줘야 한다.

현재 설치 할 시스템의 OS가 CentOs7이라서  https://github.com/NVIDIA/nvidia-docker 에서  "CentOS/RHEL 7 x86_64"  가이드 된 대로 진행을 해보면 뭔가 적절하게 되지 않는다.


그래서 구글링을 하게 되었다. http://blog.exxactcorp.com/installing-using-docker-nv-docker-centos-7/ 이 블로거가 가이드한대로 설치하면 잘 설치가 된다.

Installing and getting DOCKER and NV-DOCKER running in CentOS 7 is a straight forward process:

# Assumes CentOS 7
# Assumes NVIDIA Driver is installed as per requirements ( < 340.29 )
# Install DOCKER
sudo curl -fsSL https://get.docker.com/ | sh
# Start DOCKER
sudo systemctl start docker
# Add dockeruser, usermod change
sudo adduser dockeruser
usermod -aG docker dockeruser
# Install NV-DOCKER
# GET NVIDIA-DOCKER
wget -P /tmp https://github.com/NVIDIA/nvidia-docker/releases/download/v1.0.1/nvidia-docker-1.0.1-1.x86_64.rpm
# INSTALL
sudo rpm -i /tmp/nvidia-docker*.rpm
# Start NV-DOCKER Service
systemctl start nvidia-docker


그럼 이제 nvidia-docker 가 잘 설치가 되었다.


GPU support

Prior to installing TensorFlow with GPU support, ensure that your system meets all NVIDIA software requirements. To launch a Docker container with NVidia GPU support, enter a command of the following format:


$ nvidia-docker run -it -p hostPort:containerPort TensorFlowGPUImage

where:

  • -p hostPort:containerPort is optional. If you plan to run TensorFlow programs from the shell, omit this option. If you plan to run TensorFlow programs as Jupyter notebooks, set both hostPort and containerPort to 8888.
  • TensorFlowGPUImage specifies the Docker container. You must specify one of the following values:
    • gcr.io/tensorflow/tensorflow:latest-gpu, which is the latest TensorFlow GPU binary image.
    • gcr.io/tensorflow/tensorflow:latest-devel-gpu, which is the latest TensorFlow GPU Binary image plus source code.
    • gcr.io/tensorflow/tensorflow:version-gpu, which is the specified version (for example, 0.12.1) of the TensorFlow GPU binary image.
    • gcr.io/tensorflow/tensorflow:version-devel-gpu, which is the specified version (for example, 0.12.1) of the TensorFlow GPU binary image plus source code.

We recommend installing one of the latest versions. For example, the following command launches the latest TensorFlow GPU binary image in a Docker container from which you can run TensorFlow programs in a shell:

$ nvidia-docker run -it gcr.io/tensorflow/tensorflow:latest-gpu bash

The following command also launches the latest TensorFlow GPU binary image in a Docker container. In this Docker container, you can run TensorFlow programs in a Jupyter notebook:

$ nvidia-docker run -it -p 8888:8888 gcr.io/tensorflow/tensorflow:latest-gpu

The following command installs an older TensorFlow version (0.12.1):

$ nvidia-docker run -it -p 8888:8888 gcr.io/tensorflow/tensorflow:0.12.1-gpu

Docker will download the TensorFlow binary image the first time you launch it. For more details see the TensorFlow docker readme.


위에 내용을 참조하여 내가 실제로 수행한 명령어들은 와래와 같다.


$ sudo nvidia-docker run -d -p 8888:8888 -p 8889:8889 -p 6901:6901 --name tensorflow_gpu gcr.io/tensorflow/tensorflow:latest-gpu

위의 명령어를 수행하면 tensorflow + cuda + notebook 이 설치된 빈 깡통 Ubuntu16.04 OS가 설치된다.

※ 여기에서 중요한점은 -p 는 포트포워딩할 포트인데 내가 사용할 서버의 포트를 어떻게 사용할 것인지를 충분히 고려하여야 한다는점이다. 현재까지는 docker는 런타임중에 포트를 추가할 수 없게 되어 있다. 포트를 추가 하려면 다양한 방법이 있겠지만

나와 같은 경우에는 현재 이미지를 commit 하여 저장한 상태에서 다시 포트를 추가하여 container를 만들었다.


$ sudo nvidia-docker exec -it tensorflow_gpu bash

이 명령을 수행하게 되면 내가 생성한 tensorflow_gpu bash 컨테이너에 접속할 수 있게 된다.


Validate your installation

Run a short TensorFlow program

Invoke python from your shell as follows:

$ python

Enter the following short program inside the python interactive shell:

Python
import tensorflow as tf
hello
= tf.constant('Hello, TensorFlow!')

sess
= tf.Session()
print(sess.run(hello))

If the system outputs the following, then you are ready to begin writing TensorFlow programs:

Hello, TensorFlow!

위에도 언급했지만, nvidia-docker를 이용하여 컨테이너를 생성하면 빈깡통 ubuntu가 설치된다.

그러므로 기본 유틸리티들을 설치해주어야 한다.


Ubuntu 설치 후 기본 도구 설치

http://cafe.naver.com/telcosn/562 글 이외의 설치 목록은 아래에 있다.

apt-getinstall net-tools

apt-get install tcpdump

apt-get install apt-utils

apt install-y  vim htop  iftop tree  openssh-server  lrzsz openvswitch-switch

sudo apt-get install git


Ubuntu 설치 후 데스크탑 설치

apt-get update
apt-get upgrade
apt-get install tasksel


2


참고: https://imitator.kr/Linux/1305


Ubuntu 설치 후 tightvncserver 설치

참고: http://cafe.naver.com/telcosn/437

명령어: vncserver :100 -rfbport 6901 -geometry 1920x1080


Ubuntu 설치 후 시간 동기화

sudo dpkg-reconfigure tzdata -> asia, seoul 선택

Posted by 이성윤

필요한 정보를 최대한 인용하여 작성할 생각이다.


아래 글은 블로그(http://bcho.tistory.com/1192) 에서 인용했다.


Tensorflow Object Detection API는, Tensorflow 를 이용하여 이미지를 인식할 수 있도록 개발된 모델로, 라이브러리 형태로 제공되며, 각기 다른 정확도와 속도를 가지고 있는 5개의 모델을 제공한다. 머신러닝이나 텐서플로우에 대한 개념이 거의 없더라도 라이브러리 형태로 손쉽게 사용할 수 있으며, 직접 사용자 데이타를 업로드해서 학습을 하여, 내 시나리오에 맞는 Object Detection System을 손쉽게 만들 수 있다.


Object Detection API를 설치하기 위해서는 텐서플로우 1.x 와 파이썬 2.7x 버전이 사전 설치되어 있어야 한다. 이 글에서는 파이썬 2.7.13과 텐서플로우 2.7.13 버전을 기준으로 하고, 맥에 설치하는 것을 기준으로 한다. 리눅스나 다른 플랫폼 설치는 원본 설치 문서 https://github.com/tensorflow/models/blob/master/object_detection/g3doc/installation.md 를 참고하기 바란다.


2017.6.15에 Google에서 Tensorflow로 구현된Object Detection코드를 공개 했다. 지원하는 모델은 아래와 같다.

  • In addition to our base Tensorflow detection model definitions, this release includes:

    • A selection of trainable detection models, including:
      • Single Shot Multibox Detector (SSD) with MobileNet,
      • SSD with Inception V2,
      • Region-Based Fully Convolutional Networks (R-FCN) with Resnet 101,
      • Faster RCNN with Resnet 101,
      • Faster RCNN with Inception Resnet v2
    • Frozen weights (trained on the COCO dataset) for each of the above models to be used for out-of-the-box inference purposes.
    • Jupyter notebook for performing out-of-the-box inference with one of our released models
    • Convenient local training scripts as well as distributed training and evaluation pipelines via Google Cloud.
    SSD, RCNN 등 object detection 및 segmentation 하는 유명한 모델들이 tensorflow 안으로 들어갔다.

파이썬 라이브러리 설치


Object Detection API를 사용하는데 필요한 라이브러리 입니다. 

  • Protobuf 2.6
  • Pillow 1.0
  • lxml
  • tf Slim (which is included in the "tensorflow/models" checkout)
  • Jupyter notebook
  • Matplotlib
  • Tensorflow

pip install pillow
pip install lxml
pip install matplotlib
sudo yum install tkinter
sudo yum install protobuf
sudo yum install protobuf-compiler

pip install jupyter


Object Detection API 다운로드 및 설치


Object Detection API 설치는 간단하게, 라이브러리를 다운 받으면 된다. 설치할 디렉토리로 들어가서 git clone 명령어를 통해서, 라이브러리를 다운로드 받자

% git clone https://github.com/tensorflow/models

Protocol Buffer 컴파일

다음 프로토콜 버퍼를 사용하기 위해서 protoc로 proto 파일을 컴파일 한데, Object Detection API를 설치한 디렉토리에서 models 디렉토리로 들어간 후에, 다음 명령어를 수행한다.

" 레포지토리가 최신화가 안되어서 소스 설치를 했다. "

# $ sudo pip install protobuf
# $ yum install protobuf-compiler

% git clone https://github.com/google/protobuf.git

$ ./autogen.sh

$ ./configure --prefix=/home/tensorflow/local/protoc

$ make

$ python setup.py build

$ python setup.py test

$ sudo python setup.py install

$ protoc

$ protoc --version

export LD_LIBRARY_PATH=../src/.libs

% protoc object_detection/protos/*.proto --python_out=.


Add Libraries to PYTHONPATH

When running locally, the tensorflow/models/research/ and slim directories should be appended to PYTHONPATH. This can be done by running the following from tensorflow/models/research/:

# From tensorflow/models/research/
% export PYTHONPATH=$PYTHONPATH:`pwd`:`pwd`/slim

vi ~/venvs/tensorflow/bin/activate

PATH="$VIRTUAL_ENV/bin:$PATH:/usr/local/cuda-8.0/bin:/home/tensorflow/sylee/src/OBJ_DETECTI
ON_DEMO/models/research:/home/tensorflow/sylee/src/OBJ_DETECTION_DEMO/models/research/slim"
export PATH
PYTHONPATH="/home/tensorflow/sylee/src/OBJ_DETECTION_DEMO/models/research:/home/tensorflow/
sylee/src/OBJ_DETECTION_DEMO/models/research/slim"
export PYTHONPATH


Note: This command needs to run from every new terminal you start. If you wish to avoid running this manually, you can add it as a new line to the end of your ~/.bashrc file.


Testing the Installation

You can test that you have correctly installed the Tensorflow Object Detection
API by running the following command:

% python object_detection/builders/model_builder_test.py


NVIDIA-DOCKER - Ubuntu 16.04 설치 가이드


Tensorflow Object Detection API depends on the following libraries:
•Protobuf 2.6
•Pillow 1.0
•lxml
•tf Slim (which is included in the "tensorflow/models/research/" checkout)
•Jupyter notebook
•Matplotlib
•Tensorflow


For detailed steps to install Tensorflow, follow the Tensorflow installation instructions. A

typical user can install Tensorflow using one of the following commands:

# For CPU
pip install tensorflow
# For GPU
pip install tensorflow-gpu


The remaining libraries can be installed on Ubuntu 16.04 using via apt-get:

sudo apt-get install protobuf-compiler python-pil python-lxml
sudo pip install jupyter
sudo pip install matplotlib

Alternatively, users can install dependencies using pip:

sudo pip install pillow
sudo pip install lxml
sudo pip install jupyter
sudo pip install matplotlib

sudo apt-get install python-tk


Object Detection API 다운로드 및 설치

Object Detection API 설치는 간단하게, 라이브러리를 다운 받으면 된다. 설치할 디렉토리로 들어가서

git clone 명령어를 통해서, 라이브러리를 다운로드 받자

$ git clone https://github.com/tensorflow/models


Protobuf Compilation

The Tensorflow Object Detection API uses Protobufs to configure model and training parameters.

Before the framework can be used, the Protobuf libraries must be compiled. This should be done

by running the following command from the tensorflow/models/research/ directory:

# From tensorflow/models/research/
$ protoc object_detection/protos/*.proto --python_out=.


Add Libraries to PYTHONPATH

When running locally, the tensorflow/models/research/ and slim directories should be appended to PYTHONPATH. This can be done by running the following from tensorflow/models/research/:

# From tensorflow/models/research/$ export PYTHONPATH=$PYTHONPATH:`pwd`:`pwd`/slim

''''

PATH="$PATH:/usr/local/cuda-8.0/bin:/home/tensorflow/sylee/src/OBJ_DETECTION/modd
els/research:/home/tensorflow/sylee/src/OBJ_DETECTION/models/research/slim"
export PATH
PYTHONPATH="/usr/local/cuda-8.0/bin:/home/tensorflow/sylee/src/OBJ_DETECTION/modd
els/research:/home/tensorflow/sylee/src/OBJ_DETECTION/models/research/slim"
export PYTHONPATH

''''


Install object_detection


마지막으로, models디렉토리 에서 다음 스크립트를 실행하여 object_dection 라이브러리를 설치 할 수 있다.


sudo python setup.py install


설치도중 이와 같은 에러가 날 경우 


python-setuptools 설치를 통해 해결 할 수 있다.

sudo apt-get install python-setuptools


Testing the Installation

You can test that you have correctly installed the Tensorflow Object Detection
API by running the following command:


$ python object_detection/builders/model_builder_test.py


※ 설치 할 때부터 하나하나 기록해가면서 했어야 하는데.. 그러지 못해서 역시나.. 순서나 이런게 헛갈린다.

나중에 다시 손을 보겠다.


공부한 내용을 그때그때 바로 기록하는 습관이 갖어지길 바라며..

Posted by 이성윤

영상 분석을 위한 서버 환경이 CentOs 가 설치되어 있다.


tensorflow.org는 기본적으로 우분투 환경에서 완벽하게 지원하고 있는것으로 보인다.

궁극적으로는 ubuntu로 가는것이 맞는것으로 보이지만, 일단 회사 정책(기조?)가 CentOs로 넘어가고 있는 분위기라서

CentOs의 개발환경이 필요해진 상황이다.

ubuntu Install: http://cafe.naver.com/telcosn/552


영상분석 서버의 스펙은 아래와 같다.

OS: CentOS Linux release 7.3.1611

CPU: 1x E5-1650 V4 (6 Core, 15M Cache, 3.6 GHz, 140W)

MEM: 8x DDR4 PC19200 32GB ECC-REG

HDD: 3x HDD 3.5인치 SATA3 2TB

SSD: 1x 512GB SSD

POWER: POWER 2000W

GPU: NVIDIA TITAN X


CentOs TensorFlow 설치 과정

※ 많은 사람들이 CentOs에서는 python의 virtualenv 환경으로 설치하기를 권장해서 virtualenv 환경에서 설치

참고: https://www.tensorflow.org/install/install_linux 의 Installing with virtualenv


* GPU를 사용하고 있기 때문에 GPU 환경으로 설치

1. Install base

# yum -y install gcc gcc-c++ atlas atlas-devel gcc-gfortran openssl-devel libffi-devel
2. Installing with virtualenv
Take the following steps to install TensorFlow with Virtualenv:

Install pip and virtualenv by issuing one of the following commands:


$ sudo yum install python-pip python-devel python-virtualenv # for Python 2.7
$ sudo yum install python3-pip python3-devel python-virtualenv # for Python 3.n


Create a virtualenv environment by issuing one of the following commands:


$ virtualenv --system-site-packages targetDirectory # for Python 2.7
$ virtualenv --system-site-packages -p python3 targetDirectory # for Python 3.n


where targetDirectory specifies the top of the virtualenv tree. Our instructions assume that targetDirectory is ~/tensorflow, but you may choose any directory.

Activate the virtualenv environment by issuing one of the following commands:


$ source ~/tensorflow/bin/activate # bash, sh, ksh, or zsh
$ source ~/tensorflow/bin/activate.csh  # csh or tcsh


The preceding source command should change your prompt to the following:


(tensorflow)$ 


Ensure pip ≥8.1 is installed:


$ easy_install -U pip


Issue one of the following commands to install TensorFlow in the active virtualenv environment:


(tensorflow)$ pip install --upgrade tensorflow      # for Python 2.7(tensorflow)
$ pip3 install --upgrade tensorflow     # for Python 3.n(tensorflow)
$ pip install --upgrade tensorflow-gpu  # for Python 2.7 and GPU(tensorflow)
$ pip3 install --upgrade tensorflow-gpu # for Python 3.n and GPU


If the preceding command succeeds, skip Step 6. If the preceding command fails, perform Step 6.

(Optional) If Step 5 failed (typically because you invoked a pip version lower than 8.1), install TensorFlow in the active virtualenv environment by issuing a command of the following format:


(tensorflow)$ pip install --upgrade tfBinaryURL   # Python 2.7
(tensorflow)$ pip3 install --upgrade tfBinaryURL  # Python 3.n 


where tfBinaryURL identifies the URL of the TensorFlow Python package. The appropriate value of tfBinaryURLdepends on the operating system, Python version, and GPU support. Find the appropriate value for tfBinaryURL for your system here. For example, if you are installing TensorFlow for Linux, Python 3.4, and CPU-only support, issue the following command to install TensorFlow in the active virtualenv environment:


(tensorflow)$ pip3 install --upgrade \https://storage.googleapis.com/tensorflow/linux/cpu/tensorflow-1.4.0-cp34-cp34m-linux_x86_64.whl


If you encounter installation problems, see Common Installation Problems.
3. Next Steps After installing TensorFlow, validate the installation.
Note that you must activate the virtualenv environment each time you use TensorFlow. 
If the virtualenv environment is not currently active, invoke one of the following commands:
$ source ~/tensorflow/bin/activate      # bash, sh, ksh, or zsh
$ source ~/tensorflow/bin/activate.csh  # csh or tcsh
그래픽카드 사용시, 환경변수에 쿠다 관련 실행경로를 추가 해주어야 한다.
vi ~/venvs/tensorflow/bin/activate
PATH="$VIRTUAL_ENV/bin:$PATH:/usr/local/cuda-8.0/bin"
export PATH
LD_LIBRARY_PATH="/usr/local/cuda-8.0/lib64"
export LD_LIBRARY_PATH

When the virtualenv environment is active, you may run TensorFlow programs from this shell.
Your prompt will become the following to indicate that your tensorflow environment is active:
(tensorflow)$ 
When you are done using TensorFlow, you may deactivate the environment by invoking the deactivate function as follows:
(tensorflow)$ deactivate 
The prompt will revert back to your default prompt (as defined by the PS1 environment variable).
Uninstalling TensorFlow
To uninstall TensorFlow, simply remove the tree you created. For example:
$ rm -r targetDirectory 
※ 나의 경우에는 pip install --upgrade mock 이 설치가 안되어서 설치해줌 또한 쿠다환경은 다른 분석도구를 사용하기 위해서 사전에 설치되어 있었음
Posted by 이성윤

nvidia-smi -l 1

Posted by 이성윤
http://cafe.naver.com/telcosn/554 주소복사 게시글분석

강의를 듣기 시작했다.

강의를 2강의 쯤 들었을때 수학이 필요하겠다라는 생각이 들었다.

텐서플로우는 파이썬 기반으로 개발이 된듯 하다. 파이썬으로 가벼운 프로그램 만들 수 있는 수준이라면

강의 듣는데는 문제가 생기진 않는다.

수학 공부를.. 제대로 하지 않은 나로서는 고민이 많이 되었다.  필요한 수학을 먼저 공부하고 들을지

아니면 어차피 제공되는 TensorFlow API를 쓰면 되는거라 대략 이해되면 넘어갈지.


고민하던차에, 먼저 강의를 쭈욱 들어보기로 했다. 현재 섹션 7까지 들었다.

섹션 4까지는 그리큰 시간을 투자하지 않아도 언급되는 수학 수식에 대한 이해가 그렇게 어렵지는 않았다.

Logistic (Regression) Classification에서 부터는 어려움을 느꼈고, 수식이 정확히 이해되지 않아도 큰 그림과 설명하는 의도가 이해가 되면, 그냥 넘어가면서 섹션 7까지 왔다.


섹션7까지 오면서, 점점 더 언급되는 수식이라도 정확히 이해하고 강의를 듣고 싶은 마음이 들었다. 수식을 이해하고 있다면 좀더 재미를 느낄 수 있지 않을까 라는 생각이 들기도 한다.

그래서 잠시.. 갈길을 멈추고, 수식을 먼저 공부하고자 한다.


섹션 0. 오리엔테이션
수업 소개와 개요 미리보기 00:10:00
섹션 1. 머신러닝의 개념과 용어
기본적인 Machine Learnnig 의 용어와 개념 설명 미리보기 00:12:00
TensorFlow의 설치및 기본적인 operations (new) 00:17:00
섹션 2. Linear Regression 의 개념
Linear Regression의 Hypothesis 와 cost 00:13:00
Tensorflow로 간단한 linear regression을 구현 (new) 00:15:00
섹션 3. Linear Regression cost 함수 최소화
Linear Regression의 cost 최소화 알고리즘의 원리 00:16:00
Linear Regression 의 cost 최소화의 TensorFlow 구현(new) 00:15:00
섹션 4. 여러개의 입력(feature)의 Linear Regression
multi-variable linear regression (new) 00:17:00
lab 04-1: multi-variable linear regression을 TensorFlow에서 구현하기 미리보기 00:08:00
lab 04-2: TensorFlow로 파일에서 데이타 읽어오기 (new) 00:06:00
섹션 5. Logistic (Regression) Classification
Logistic Classification의 가설 함수 정의 00:15:00
Logistic Regression의 cost 함수 설명 00:14:00
TensorFlow로 Logistic Classification의 구현하기(new) 00:15:00
섹션 6. Softmax Regression (Multinomial Logistic Regression)
Multinomial 개념 소개 00:10:00
Cost 함수 소개 00:15:00
lab 06-1: TensorFlow로 Softmax Classification의 구현하기 (new) 00:12:00
lab 06-2: TensorFlow로 Fancy Softmax Classification의 구현하기 (new) 00:16:00
섹션 7. ML의 실용과 몇가지 팁
학습 rate, Overfitting, 그리고 일반화 (Regularization) 00:14:00
Training/Testing 데이타 셋 00:09:00
lab 07-1: training/test dataset, learning rate, normalization (new) 00:11:00
lab 07-2: Meet MNIST Dataset (new) 00:13:00


Posted by 이성윤

TensorFlow를 본격적으로 시작하기전에, 관련된 블로그, 책, 까페, 강의 뭐 이런것들에 대한 정보를 수집하였다.


처음엔 팀장님이 말한 CNN위주로 검색을 했지만, 키워드를 TensorFlow와 머신러닝에 맞추었다.


다행이도, 가장 먼저 아주 훌륭한 TensorFlow강의를 발견하게 되었다.


강의제목

모두를 위한 머신러닝/딥러닝

강의URL

https://www.inflearn.com/course/%EA%B8%B0%EB%B3%B8%EC%A0%81%EC%9D%B8-%EB%A8%B8%EC%8B%A0%EB%9F%AC%EB%8B%9D-%EB%94%A5%EB%9F%AC%EB%8B%9D-%EA%B0%95%EC%A2%8C/

1. 강좌 소개

알파고와 이세돌의 경기를 보면서 이제 머신 러닝이 인간이 잘 한다고 여겨진 직관과 의사 결정능력에서도 충분한 데이타가 있으면 어느정도 또는 우리보다 더 잘할수도 있다는 생각을 많이 하게 되었습니다. Andrew Ng 교수님이 말씀하신것 처럼 이런 시대에 머신 러닝을 잘 이해하고 잘 다룰수 있다면 그야말로 “Super Power”를 가지게 되는 것이 아닌가 생각합니다.

더 많은 분들이 머신 러닝과 딥러닝에 대해 더 이해하고 본인들의 문제를 이 멋진 도구를 이용해서 풀수 있게 하기위해 비디오 강의를 준비하였습니다. 더 나아가 이론에만 그치지 않고 최근 구글이 공개한 머신러닝을 위한 오픈소스인 TensorFlow를 이용해서 이론을 구현해 볼수 있도록 하였습니다.

이 머신러닝, 딥러닝 강좌는 수학이나 컴퓨터 공학적인 지식이 없이도 쉽게 볼수 있도록 만들려고 노력하였습니다.

2. 도움되는 분들

  • 인공지능에 대해 관심이 있는 누구나
  • 머닝러신, 딥러닝의 개념을 이해하고 싶으신분
  • 머닝러신의 직접 구현해보고 싶으신 분

3. 참고자료

이 비디오는 저도 인터넷등을 통해 공부하면서 만든것이며 아래 자료를 많이 사용하였습니다.

4. 지식공유자 소개

김성훈

Hong Kong University of Science and Technology 에서 컴퓨터 공학쪽으로 연구를 하고 있습니다.
비디오나 강의에 대한 의견이 있으시면 아래로 이메일을 보내 주시면 됩니다.
hunkim+ml@gmail.com


강의를 듣다가 이것저것 검색하다보니, 굳이 위의 사이트를 가입하지 않아도 볼 수 있었다..

http://hunkim.github.io/ml/


한마디 더 붙이자면, 김성훈 교수님같이 자신의 시간을 투자하여 아낌 없이 가지고 있는 지식을 공유하는분들이

점점 늘어나고 있다. 덕분에 많은 도움을 받고있다. 감사합니다.

Posted by 이성윤