이제 마지막 단계이다.
학습된 데이터를 기반으로 Object Detection API를 활용하여 test디렉토리에 있는 학습하지 않은 새로운 이미지를 인풋으로 주어 학습 데이터의 정확도를 검증할 차례이다. 그 과정은 아래와 같다.
8. Detect custom objects in real time
Welcome to part 6 of the TensorFlow Object Detection API tutorial series. In this part of the tutorial, we are going to test our model and see if it does what we had hoped. In order to do this, we need to export the inference graph.
Luckily for us, in the models/object_detection directory, there is a script that does this for us: export_inference_graph.py
To run this, you just need to pass in your checkpoint and your pipeline config, then wherever you want the inference graph to be placed. For example:
|
|
python3 export_inference_graph.py \ --input_type image_tensor \ --pipeline_config_path training/ssd_mobilenet_v1_pets.config \ --trained_checkpoint_prefix training/model.ckpt-10856 \ --output_directory mac_n_cheese_inference_graph |
cs |
Your checkpoint files should be in the training directory. Just look for the one with the largest step (the largest number after the dash), and that's the one you want to use. Next, make sure the pipeline_config_path is set to whatever config file you chose, and then finally choose the name for the output directory, I went with mac_n_cheese_inference_graph
Run the above command from models/object_detection
나의 경우에는 아래와 같이 설정을 했다.
TODO 각각의 파라미터들에 대해서 정리하자.
|
|
python3 export_inference_graph.py \ --input_type image_tensor \ --pipeline_config_path TELCO_OBJ_DETECTION/training/ssd_mobilenet_v1_pets.config \ --trained_checkpoint_prefix TELCO_OBJ_DETECTION/training/model.ckpt-33354 \ --output_directory mac_n_cheese_inference_graph |
cs |
Otherwise, you should have a new directory, in my case, mine is mac_n_cheese_inference_graph, inside it, I have new checkpoint data, a saved_model directory, and, most importantly, the forzen_inference_graph.pb file.
TODO mac_ncheese_inference_graph에 생성된 각각의 파일들에 대해서 정리하자.
Now, we're just going to use the sample notebook, edit it, and see how our model does on some testing images. I copied some of my models/object_detection/images/test images into the models/object_detection/test_images directory, and renamed them to be image3.jpg, image4.jpg...etc.
Object Detection API에서 제공하는 object_detection_tutorial.ipynb를 활용하여 images/test에 있는 시험용 이미지들을 object_detection/test_images 디렉토리에 옮겨 학습이 제대로 이루어졌는지 정확도를 측정해 볼 차례이다.
Object Detection API를 사용하는 방법은 [API] Object Detection API를 이용한 오브젝트 인식하기 Part 1. - 설정 [펌] 포스팅을 참조하면 된다.
추가적으로, 우리가 만든 모델을 적용하기위해서 몇 가지 정보를 수정해주어야 한다.
Booting up jupyter notebook and opening the object_detection_tutorial.ipynb, let's make a few changes. First, head to the Variables section, and let's change the model name, and the paths to the checkpoint and the labels:
|
# What model to download. MODEL_NAME = 'mac_n_cheese_inference_graph' # Path to frozen detection graph. This is the actual model that is used for the object detection. PATH_TO_CKPT = MODEL_NAME + '/frozen_inference_graph.pb' # List of the strings that is used to add correct label for each box. PATH_TO_LABELS = os.path.join('training', 'object-detection.pbtxt') NUM_CLASSES = 1 |
cs |
Next, we can just delete the entire Download Model section, since we don't need to download anymore.
|
|
opener = urllib.request.URLopener() opener.retrieve(DOWNLOAD_BASE + MODEL_FILE, MODEL_FILE) tar_file = tarfile.open(MODEL_FILE) for file in tar_file.getmembers(): file_name = os.path.basename(file.name) if 'frozen_inference_graph.pb' in file_name: tar_file.extract(file, os.getcwd()) |
cs |
Finally, in the Detection section, change the TEST_IMAGE_PATHS var to:
|
|
PATH_TO_TEST_IMAGES_DIR = 'test_images'
TEST_IMAGE_PATHS = [ os.path.join(PATH_TO_TEST_IMAGES_DIR, 'image{}.jpg'.format(i)) for i in range(1, 8) ] # Size, in inches, of the output images. IMAGE_SIZE = (12, 8) |
cs |
Here are a few of my results:
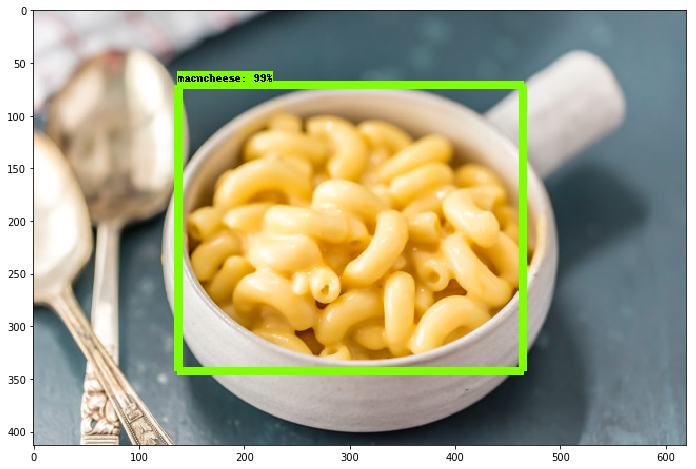
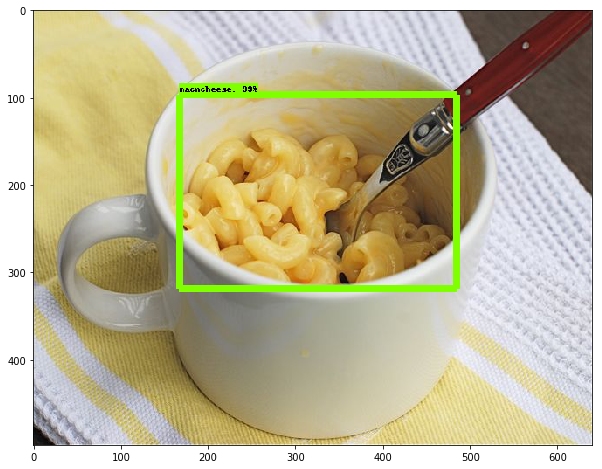
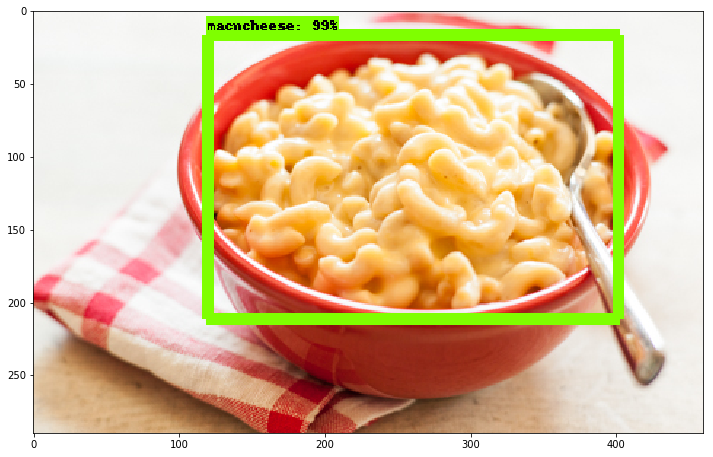
나는 GPU를 이용하여 약 35,000번의 학습단계를 거쳐서 로스가 약 0.8정도까지 내려가도록 학습하였다. 학습을 하면서 느낀거지만 35,000번을 수행하는동안 체감상 약 3시간 정도 걸린것 같다. 로스가 0에 가까워지는 수치가 되었다는것은 아주 훌륭하게 학습이 되었다는것을 의미하기도 하다.
100개의 이미지를 가지고 학습을 진행하였는데 생각보다 더 훌륭한 결과를 보여주고 있는게 아닌가 싶다.
Tensorflow에서 제공하는 Object Detection API덕분에 내가 AI를 통해서 해볼 수 있는 것들을 아주 쉽고 편하게 사용을 해본것 같다.(이것은 생각 이상으로 결과를 빨리 얻었다고 생각한다) 지금까지 해본 것들을 정리해 보면 아래와 같다.
- 나만의 이미지를 학습시키는 방법,
- 학습된 이미지를 사용해보는 방법
- 다양한 모델을 적용해보는 방법
- 이미지에서 특정 오브젝트들을 탐지하는 방법
- 실시간/비실시간 영상에서 특정 오브젝트들을 탐지하는 방법
여기까지 진행해온 동안, 여러 가지 결과를 빨리 보고 싶어서 중간중간 알아야할 것들을 그냥 지나쳐왔다. 이제부터는 지나쳤던 정보들을 하나하나 정리해가는 시간을 가져야겠다.
'머신러닝&딥러닝 개발 > Tensorflow Development' 카테고리의 다른 글
| [Object Detection API] 화재/폭발(폭발) 데이터셋 생성 및 학습 (0) | 2017.12.18 |
|---|---|
| [API] Custom Object Detection API Tutorial: 설정 및 학습 - Part. 2 (2) | 2017.12.18 |
| [API] Custom Object Detection API Tutorial: 데이터 준비 - Part. 1 (0) | 2017.12.18 |
| [API] Custom Object Detection API Tutorial: KickOff - Part. 0 (0) | 2017.12.18 |
