머신러닝을 시작하면서 "데이터가 가장 중요하다.", "데이터가 돈이 된다" 이런 말들을 들었었다.
저런 말들을 들었을때, 그럴 수 있겠구나 싶었지만 와닿지는 않았다.
이번 과정을 통해서 왜 알바를 써서 이미지를 레이블링하는지, 왜 데이터가 중요하는지 등을 느낄 수 있었다.
1. 학습시킬 이미지 준비
sentdex로 부터 제공받은 macaroni and cheese를 사용하겠다. 이미지는 Google, Bing, ImageNet에서 수집했으며 이미지의 크기는 대부분 800x600 이다.
어떤 이미지이든지 100개 이상의 이미지를 확보해야 하며, 이미지가 확보 되면 레이블링 처리하는 Annotation을 수행해야 한다.
- TODO 구글에서 내가 원하는 이미지를 확보할 수 있는 도구 찾아보기
- TODO 구글에서 내가 원하는 이미지를 쉽게 확보 할 수 있는 도구 만들어보기
2. Annotate/label
이미지 레이블링은 labelImg 도구를 사용한다.
labelImg: https://github.com/tzutalin/labelImg
labelImg 설치는 다음을 참조한다.
[설치] image annotation tool
http://cafe.naver.com/telcosn/661
labelImg를 설치하고나서 데스크탑 모드에서 실행을 한다.
$ python labelImg.py
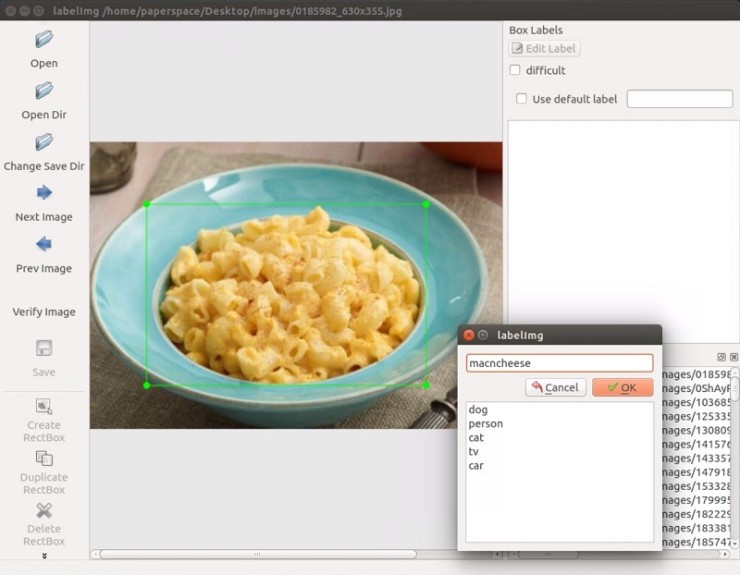
실행을 하고나면, GUI Window가 실행된다.
- 이미지가 저장되어 있는 디렉토리를 오픈한다.
- Create RectBox 버튼을 클릭하여 사진에서 Object를 드래그하여 레이블링을 한다.
- ctrl+s 로 저장을 하면 이미지와 같은 이름으로 xml 파일이 생성된다. 일반적으로 ANNOTATION이라는 디렉토리에 저장하는것이 관례인듯하다.
※ TODO XML파일을 열어보니 각각의 의미하는 내용을 정리해야 할 것 같다.
<folder>images</folder>
<filename>velveetashellsandcheese.jpg</filename>
<path>/home/paperspace/Desktop/images/velveetashellsandcheese.jpg</path>
<source>
<database>Unknown</database>
</source>
<size>
<width>900</width>
<height>602</height>
<depth>3</depth>
</size>
<segmented>0</segmented>
<object>
<name>macncheese</name>
<pose>Unspecified</pose>
<truncated>0</truncated>
<difficult>0</difficult>
<bndbox>
<xmin>167</xmin>
<ymin>169</ymin>
<xmax>795</xmax>
<ymax>527</ymax>
</bndbox>
</object>
</annotation>cs
- 보유하고 있는 모든 이미지를 위의 방법으로 반복해서 작업한다.
3. 보유하고 있는 데이터를 train/test sample로 나누기
아래의 디렉토리 구조를 생성하고, 보유하고 있는 데이터를 train/test를 나눈다.
--test/
---testingimages.jpg
--train/
---testingimages.jpg
--...yourimages.jpg--...yourimages.xmlcs
4. 학습을 위한 TF Records 변환
참고: [TFRecord] 텐서플로우 트레이닝 데이타 포맷인 *.tfrecord 파일 읽고 쓰기 [펌]
TFRecord 파일 포맷이란
TFRecord 파일은 텐서플로우의 학습 데이타 등을 저장하기 위한 바이너리 데이타 포맷으로, 구글의 Protocol Buffer 포맷으로 데이타를 파일에 Serialize 하여 저장한다.
CSV 파일에서와 같이 숫자나 텍스트 데이타를 읽을때는 크게 지장이 없지만, 이미지를 데이타를 읽을 경우 이미지는 JPEG나 PNG 형태의 파일로 저장되어 있고 이에 대한 메타 데이타와 라벨은 별도의 파일에 저장되어 있기 때문에, 학습 데이타를 읽을때 메타데이타나 라벨용 파일 하나만 읽는 것이 아니라 이미지 파일도 별도로 읽어야 하기 때문에, 코드가 복잡해진다.
또한 이미지를 JPG나 PNG 포맷으로 읽어서 매번 디코딩을 하게 되면, 그 성능이 저하되서 학습단계에서 데이타를 읽는 부분에서 많은 성능 저하가 발생한다.
이와 같이 성능과 개발의 편의성을 이유로 TFRecord 파일 포맷을 이용하는 것이 좋다.
위와 같은 이유로 TFRecord 파일로 변환하기 위해서 labelImg를 통해 생성한 xml 파일을 먼저 CSV 파일로 변환해야 한다.
① xml 파일을 csv 파일로 변환하기 위해 Dat Tran 블로거가 작성한 xml_to_csv.py 스크립트를 사용한다.
github: https://github.com/datitran/raccoon_dataset
raccoon_dataset 의 xml_to_csv.py 스크립트를 수정하여 사용한다.
Within the
xml_to_csvscript, I changed:
image_path = os.path.join(os.getcwd(), 'annotations')
xml_df = xml_to_csv(image_path)
xml_df.to_csv('raccoon_labels.csv', index=None)
print('Successfully converted xml to csv.')cs To:
for directory in ['train','test']:
image_path = os.path.join(os.getcwd(), 'images/{}'.format(directory))
xml_df = xml_to_csv(image_path)
xml_df.to_csv('data/{}_labels.csv'.format(directory), index=None)
print('Successfully converted xml to csv.')cs
생성된 CSV 파일을 Object-Detection 디렉토리에 data 디렉토리를 생성하고, data 디렉토리로 csv 파일을 옮긴다. 그리고 Object-Detection 디렉토리에 training 디렉토리를 생성한다. 지금까지의 디렉토리 구조는 아래와 같다.
-data/
--test_labels.csv
--train_labels.csv
-images/
--test/
---testingimages.jpg
--train/
---testingimages.jpg
--...yourimages.jpg
-training
-xml_to_csv.pycs
② 이제 CSV 파일을 TFRecord파일로 변환하기 위해 Dat Tran 블로거가 작성한 generate_tfrecord.py 스크립트를 사용한다.
Within the generate_tfrecord script, I changed:
def class_text_to_int(row_label):
if row_label == 'raccoon':
return 1
else:
Nonecs To:
def class_text_to_int(row_label):
if row_label == 'macncheese':
return 1
else:
Nonecs
TODO 현재 Class가 macncheese 한 종류이기 때문에 하나만 작성한다. 만약 여러개의 클래스가 있다면 이부분을 수정해야 한다.
이제 generate_tfrecord.py 스크립트를 수행한다. train TFRecord와 test TFRecord를 위해 두번 수행하게 된다.
train TFRecord:
cs test TFRecord:
cs
Next up, we need to setup a configuration file and then either train a new model or start from a checkpoint with a pre-trained model, which is what we'll be covering in the next tutorial.
'머신러닝&딥러닝 개발 > Tensorflow Development' 카테고리의 다른 글
| [Object Detection API] 화재/폭발(폭발) 데이터셋 생성 및 학습 (0) | 2017.12.18 |
|---|---|
| [API] Custom Object Detection API Tutorial: Object Detection Test - Part. 3 (0) | 2017.12.18 |
| [API] Custom Object Detection API Tutorial: 설정 및 학습 - Part. 2 (2) | 2017.12.18 |
| [API] Custom Object Detection API Tutorial: KickOff - Part. 0 (0) | 2017.12.18 |
